 |
Converting text to an image on a Web page
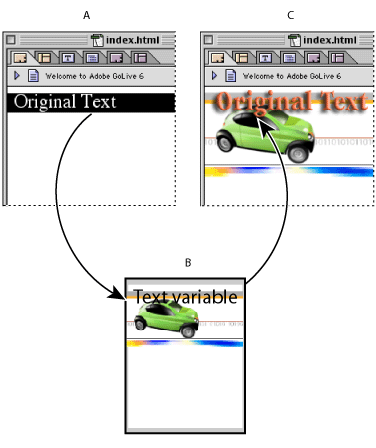
You can transform inanimate HTML text to a dynamic animation or image using the Convert Text to Banner command. This feature lets you quickly create Web page banners or other visual elements using text in a Web page layout. Similar to working with variables, the GoLive Convert Text to Banner command lets you take HTML text and use a LiveMotion (LIV), Illustrator (SVG), or Photoshop (PSD) file with variables as a template to create a new target file. (See Creating multiple versions of an image using variables.)
The Convert Text to Banner command replaces the HTML text with a Smart Object and uses the Smart Object workflow to create a target file containing the text. If you use an Illustrator SVG or Photoshop PSD file, GoLive uses the Save For Web feature to create the target file. You don't need Illustrator or Photoshop installed on your computer. However, if you use a LIV file, you will need LiveMotion installed on your computer.
As with all Smart Objects, generating the target file does not alter the source file. The Smart Object maintains a link between the target and the source files, so updating the source file automatically updates the target file that's on a page open in the Layout Editor.
To convert text to an image or animation using a LiveMotion (LIV) file with variables:
- Select text in the Layout Editor.
- Choose Special > Convert Text to Banner.
- Specify a LiveMotion file with variables, and click Open.
- Modify the text, if you wish, or set other variables, and then click OK. For information about variable settings, see Working with variables in a LiveMotion file.
- Do one of the following in the Matte Color dialog box:
- Click the Set Matte Color option, double-click the Color Picker box to select a color in the Color Picker, and click OK.
- Click Set to Background to use the background color as the matte color, and click OK.
- Click OK to keep the matte color as is.
- Click OK.
- In the Specify Target File dialog box, specify a name and location for the target file, and click Save.
GoLive inserts a Smart Object placeholder where the text was.
GoLive starts LiveMotion to generate a target SWF file. The Variable Settings dialog box appears. Set Text is selected, and the HTML text appears in the text box.
To convert text to an image using an Illustrator (SVG) or Photoshop (PSD) file with variables:
- Select text in the Layout Editor.
- Choose Special > Convert Text to Banner.
- Specify an Illustrator SVG or Photoshop PSD file with variables, and click Open.
- Modify the text, if you wish. If the image is in SVG format, you can also select a visibility variable and specify whether an object is visible or invisible. (For more information about working with variables in an Illustrator file, see Working with variables in an Illustrator SVG file.) When you're done using the Variable Settings dialog box, click OK.
- Click OK.
- In the Save For Web dialog box, select a predefined optimization setting from the Settings pop-up menu or create your own using the available pop-up menus, and click Save.
- In the Specify Target File dialog box, specify a name and location for the target file, and click Save.
GoLive inserts a Smart Object placeholder where the text was.
The Variable Settings dialog box appears. Set Text is selected, and the HTML text appears in the text box.
Note: You cannot specify a visibility variable if you use a Photoshop file. GoLive only regards the topmost text layer of a PSD file as a variable. For more information about variables in a Photoshop file, see Using a text variable in a Photoshop file.