 |
Building a Web page using tracing images
Many designers use Photoshop or Illustrator to create a dummy page as a basis for a Web page layout. The GoLive tracing image feature lets you use an image as a background template or guide as you construct the page on top of it. You can import the following image formats as tracing images: Illustrator, Photoshop (only 8-bit images), JPG, GIF, PNG, BMP, TARGA, EPS, PCX, PDF, PICT (Mac OS), PIXAR, SVG, TIFF, and Amiga IFF. You don't have to convert Illustrator (AI) and Photoshop (PSD) files to a Web-safe format in their native applications before using them as tracing images in GoLive. The Save For Web feature lets you do the conversion within GoLive.
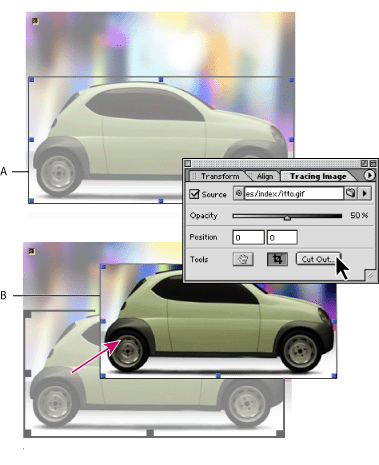
The power of a tracing image is that it can be used for more than simply a background template or guide. You can cut out a portion of the tracing image and these become an object on your Web page. You don't have to leave GoLive to create the object from the source file, and you don't have to spend time reconstructing the elements you've already created in Photoshop or Illustrator.
To add a tracing image to your Web page:
- Select Window > Tracing Image. In the Tracing Image palette, select Source and specify a file for the tracing image.
- Set the opacity of the tracing image in the Tracing Image palette.
- Do one of the following to position the image in the Layout Editor:
- Type pixel values in the Position text boxes.
- Click the move image tool
 in the Tracing Image palette, and drag the image in the Layout Editor. When you're done, click the move image tool button again to disable the tool.
Note: You can quickly resize the window to fit the tracing image by selecting Tracing Image from the Change Window Size pop-up menu in the bottom right corner of the document window.
To cut out a portion of a tracing image:
- Add and position a tracing image on your page.
- Click the cut out tool
 (similar to Photoshop's Crop tool) and select a rectangular portion of the tracing image.
 - Double-click the selection or click the Cut Out button in the Tracing Image palette.
- In the Save For Web dialog box, make your desired optimization settings, and click Save.
- Specify a destination for the file and click Save. The cutout appears as a layer in a floating box in the document window.
- Reset the position of the tracing image to 0/0.
- Align the tracing image relative to a selection in the document. For example, you can select a table cell or a floating box to align the tracing image with. The tracing image will be inserted at position 0/0 relative to the selected table cell or floating box.
Note: You can cancel the cut out process by clicking the Cut Out Tool button again.

The Tracing Image palette's menu lets you perform several actions on a tracing image:
To remove a tracing image:
Deselect the Source check box in the Tracing Image palette.