 |
Working with Photoshop layered files
GoLive lets you import Photoshop layered images so that each layer in the image is converted into an appropriate Web-safe format of your choosing. The converted layers appear in the Web page in separate floating boxes, which can be converted later to a layout grid and standard HTML table as long as none of the layers are overlapping each other. (See Laying out pages with floating boxes.) This method of importing a Photoshop image is different from placing a Smart Photoshop object on a Web page. Except for layer-based slices, a layered Photoshop file imported as a Smart Object is flattened into one image.
Note: You cannot import a layered Illustrator image into GoLive.
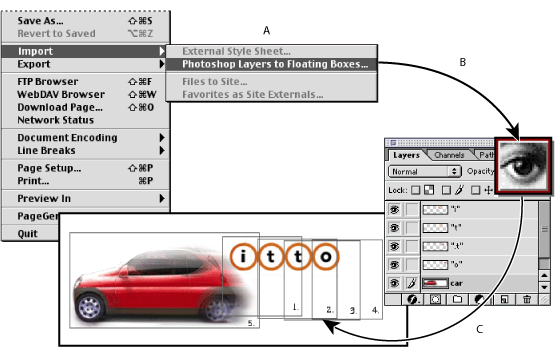
To import a layered Photoshop image:
- Make sure a layout page is open in the document window.
- Choose File > Import > Photoshop Layers to Floating Boxes.
- Select the folder where you want to save the layers (for example, in an images folder within your Web site folder), and click Open.
- In the Save For Web dialog box, choose the optimization settings you want for the first layer, and then do one of the following:
- Click Save. GoLive adds the first layer as a lowest layer on the page, and then opens the Save For Web dialog box for each remaining layer. Repeat the process of choosing an optimization setting and clicking Save for each layer. Each layer is placed in a separate floating box in the Layout Editor.
- Hold down the Ctrl (Windows) or Control (Mac OS) key while clicking Save. This changes the Save command to Save All. Save All applies the same settings to all layers in the imported Photoshop file. Each layer is placed in a separate floating box in the Layout Editor. For additional details on the optimization options, see About the Save For Web dialog box.
Note: If you import more than one layered image, you may want to create a separate destination folder (for instance, a subfolder within your images folder) for each layered image you import so that the multiple layers do not become mixed up with one another.
Clicking Cancel only cancels the Web settings process for the current layer. Press Ctrl (Windows) or Control (Mac OS) while clicking Cancel to cancel the Web setting process for all the remaining layers.
Note: Some browsers have difficulty handling floating boxes with names that begin with a number. Since GoLive uses the layer names to generate names for the floating boxes, it's important that you do not assign names to layers in Adobe Photoshop that begin with numbers or consist only of numbers. If necessary, you can change the names of the floating boxes after the layered Photoshop file is brought into GoLive.