 |
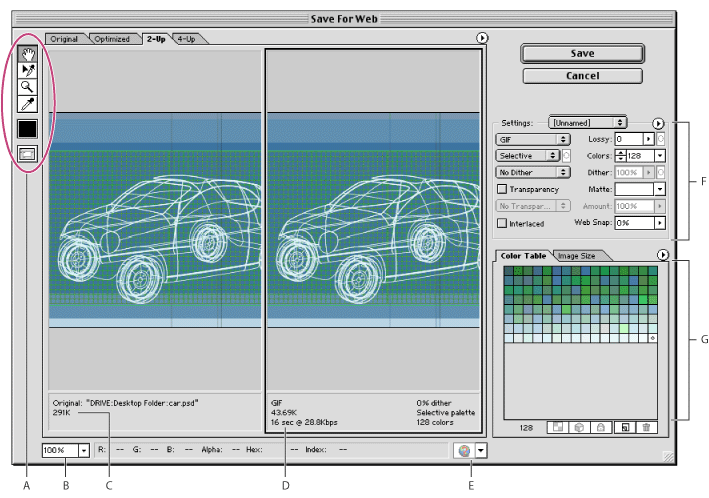
About the Save For Web dialog box
You use the Optimize panel of the Save For Web dialog box to select the compression file format and other optimization settings for a Smart Photoshop or Smart Illustrator object. GoLive automatically displays the Save For Web dialog box when you use the Smart Object workflow to add a Photoshop or Illustrator image to a Web page.
The View options in the GoLive Save For Web dialog box let you switch easily between optimized and original (nonoptimized) versions of an image and view up to four versions of an optimized image simultaneously.
To display the Save For Web dialog box:
- Add a Smart Photoshop object to a Web page layout or add a Smart Illustrator object to the Layout Editor. (See Adding a Smart Photoshop object and Adding Illustrator artwork.)
- Select a Smart Photoshop object or Smart Illustrator object on a layout page, and then click the Settings button in the Smart Image Inspector.
Do one of the following:
Note: When you add a Smart Illustrator object, you must choose Bitmap format in the Conversions Settings dialog box to open the Save For Web dialog box.

Viewing images
Click a tab at the top of the image area to select a display option: Original to view the image with no optimization, Optimized to view the image with the current optimization settings applied, 2-Up to view two versions of the image side by side, or 4-Up to view four versions of the image side by side.
If the entire artwork is not visible in the Save For Web dialog box, you can use the hand tool to bring another area into view. Select the hand tool ![]() (or hold down the spacebar), and drag in the view area to pan over the image. You can also use the zoom tool to magnify or reduce the view. Select the zoom tool
(or hold down the spacebar), and drag in the view area to pan over the image. You can also use the zoom tool to magnify or reduce the view. Select the zoom tool ![]() and click in a view to zoom in; hold down Alt (Windows) or Option (Mac OS) and click in a view to zoom out. Alternatively, you can specify a magnification level in the Zoom text box at the bottom of the Save For Web dialog box.
and click in a view to zoom in; hold down Alt (Windows) or Option (Mac OS) and click in a view to zoom out. Alternatively, you can specify a magnification level in the Zoom text box at the bottom of the Save For Web dialog box.
Selecting a view
Click a different pane in the Save For Web dialog box to select a new view. If you're working in 2-Up or 4-Up view, you must select a view before you apply optimization settings. The selected view is indicated by a black frame.
Viewing annotations
The annotation area in the Save For Web dialog box provides valuable optimization information. For the original image, the annotation area shows the file name and file size. For the optimized image, the annotation area shows the current optimization options, the size of the optimized file, and the estimated download time using the selected modem speed. You use the Preview pop-up menu to select the modem speed for which you want to view the estimated download time. To open the Preview pop-up menu, click the triangle ![]() to the right of the optimized image.
to the right of the optimized image.