 |
Working with files and folders
In the site window, arrange files in folders to keep them in order. For example, create separate folders for storing pages, images, and animations in the Files tab in the site window.
Important: When using GoLive, you can reference files in any folder on your system. However, if you use a system tool such as Explorer (Windows) or Finder (Mac OS) to move, rename, or delete site files, GoLive doesn't update link and reference information. This is why it's highly recommended that you work in the site window when moving, renaming, or deleting files. If you do move, rename, or delete files with a system tool, be sure to refresh the view of files in the site window. (See Refreshing the site window.)
Similarly, use the site window to arrange non-file items in groups. (GoLive treats and displays a group in the site window as a type of folder, but all groups are stored within the Settings folder rather than within other regular folders on your hard disk.) Items in the Files and Library tabs are stored in regular folders. All non-file items in the External, Colors, and Font Sets tabs are stored in groups.
To create a folder (group or regular folder):
- Click the tab where you want to create the folder.
- If you want the folder you are creating to be subordinate to an existing folder in the tab, select the existing folder.
- Do one of the following:
- Click the New Folder button
 on the toolbar.
 - Choose Site > New > Folder.
- To add a folder to the Files, Extras, or Library tab, drag the Folder icon from the Site set
 of the Objects palette to the site window.
 - To add a group to the External tab, drag the URL Group icon or Address Group icon from the Site set
 of the Objects palette to the site window.
 - Enter a new name for the folder or group. (See About filenames.)
- Move items into the folder as necessary.
GoLive assigns a generic name of "folder" for a new folder in the File and Library tabs, or "untitled group" for a new group in the Colors, External, or Font Sets tabs.
![]() You can also import files and other items into a site. (See Adding existing files.)
You can also import files and other items into a site. (See Adding existing files.)
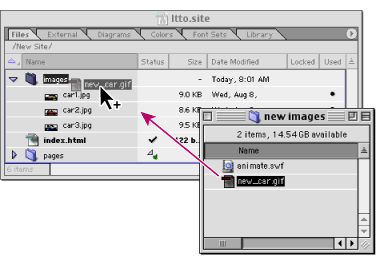
To move a file or object to a folder (group or regular folder):
- Do one of the following:
- Drag the file or object from a folder in the Explorer (Windows) or Finder (Mac OS) into a folder or tab in the site window.
- Drag an object into a group.
- If you are moving a file containing links or file references, click OK in the Move Files dialog box to update them.

![]() If you want the target folder to open so that you can see its contents, hover over its icon before releasing the mouse button. If you want to target a folder one level up from the folder displayed in the tab you are dragging into, drag the file or object to the Up One Level button
If you want the target folder to open so that you can see its contents, hover over its icon before releasing the mouse button. If you want to target a folder one level up from the folder displayed in the tab you are dragging into, drag the file or object to the Up One Level button ![]() (Windows) or
(Windows) or ![]() (Mac OS) at the top of the tab.
(Mac OS) at the top of the tab.
Important: If you exclude any file from updating, broken links and invalid file references might result.
To open the desktop folder containing a file or folder in the site window:
- Select the file or folder in the site window. You can select only regular folders and files, not groups or objects in groups.
- Do one of the following:
- Click the Reveal in Explorer (Windows) or Reveal in Finder (Mac OS) button
 on the toolbar.
 - Choose Site > Explorer > Reveal Object (Windows) or Site > Finder > Reveal Object (Mac OS).