 |
Making selections within tables
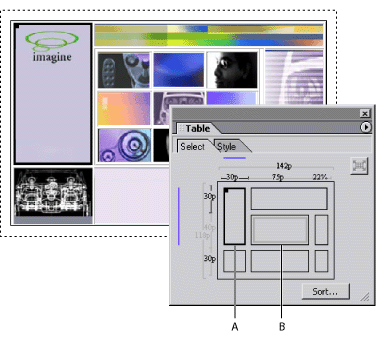
As you design a table and add images and other content to it, selecting cells or nested tables can become difficult. GoLive provides you with a variety of ways to select cells, rows, columns, and nested tables to suit your needs. You can make selections directly in the document window, in the markup tree bar, or in an outline of the table in the Select tab of the Table palette. The Select tab shows a table as a bare outline, and enables you to make cell or nested table selections without the risk of resizing the selection or selecting content inside the cell.
Selected cells are outlined in bold in the document window and in the Table palette, and highlighted in source code views. In the Layout editor or Table palette, a black rectangle in the upper left corner of the selected cells can be dragged to a new location in the table or to create a new table. (Blue lines indicate the selection and sorting region.)

![]() If you place an insertion point in a table cell, select content in a cell, or select a table cell, you can press Ctrl+Enter (Windows) or Control+Return (Mac OS) to navigate outward from a cell to a table to a parent table cell within a table or nested table.
If you place an insertion point in a table cell, select content in a cell, or select a table cell, you can press Ctrl+Enter (Windows) or Control+Return (Mac OS) to navigate outward from a cell to a table to a parent table cell within a table or nested table.
To select a table or nested table:
- In the document window, move the pointer over the top or left edge of the table until the pointer changes to the table selection pointer
 , and then click.
 - In the document window, place an insertion point in the table and choose Select Table from the context menu, or click the <table> tag in the markup tree bar at the bottom of the page. Alternatively, press Ctrl+Enter (Windows) or Control+Return (Mac OS) twice.
- Place an insertion point in the table, and in the Select tab of the Table palette, choose Select Table from the context menu.
- If the table is nested within another table (nested tables display as a grey outline), move the pointer over the nested table until the pointer changes to the Nested Table pointer
 in the Table palette's Select tab. Then click to select the nested table and zoom to its boundaries in the palette. Click the Select Parent Table button
  in the Table palette to reselect the parent table and zoom out of the nested table.
Do one of the following:
To select rows:
- In the document window or Select tab of the Table palette, move the pointer over the left edge of a row until it changes to the row selection pointer
 , and then click. Drag up or down to add adjacent rows to your selection. Alternatively, with the row selection pointer, Shift-click the left edge of each additional row.
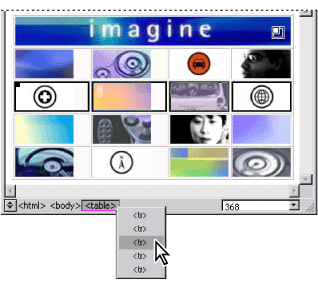
 - Place an insertion point in the row, and click the rightmost <tr> tag in the markup tree bar at the bottom of the page. To add rows to your selection, move the pointer over the left edge of each additional row in the document window until it changes to the row selection pointer, and then Shift-click.
- Place an insertion point anywhere in the table, click the <table> tag in the markup tree bar at the bottom of the page, drag to the right to display a pop-up menu, and then choose the <tr> tag for a row. To add rows to your selection, move the pointer over the left edge of each additional row in the document window until it changes to the row selection pointer, then Shift-click.
Do one of the following:

To select columns:
- In the document window or the Select tab of the Table palette, move the pointer over the top edge of a column until the pointer changes to the column selection pointer
 , then click. Drag left or right to add adjacent columns to your selection. Alternatively, with the column selection pointer, Shift-click the top edge of each additional column.
Do one of the following:
To select cells:
- In the document window, move the pointer over the cell's bottom or right edge until the pointer changes to an arrow
 , and then click. Drag from the selected cell to add adjacent cells to your selection. Alternatively, Shift-click inside each additional cell.
 - Place an insertion point in the cell, and either click the rightmost <td> tag in the markup tree bar at the bottom of the page, or press Ctrl+Enter (Windows), Control+Return (Mac OS). Alternatively, choose Select Cell from the context or Special > Table menu.
- In the Select tab of the Table palette, click to select a cell. Click-drag from the selected cell to add adjacent cells to your selection. Alternatively, Shift-click each additional cell.
- To select all cells, select any corner cell in the document window or the Select tab of the Table palette, and then drag over all cells in the table. You can also select a cell, and from the Edit menu or the document window's context menu, choose Select All.
- To invert the selection of cells within a row or column, move the pointer over the left edge of the row or the top edge of the column until it changes to the row or column selection pointer
 ,
,  , and then Shift-click. (GoLive deselects previously active cells in the row or column and selects previously inactive cells.)
Do one of the following: