 |
Adding tracks to movies
Tracks are the basic unit you use in creating a QuickTime movie, and each type of track contains a particular kind of information. For example, a video track contains video content, and a sound track contains audio content. In the Inspector for each track, you can set options that affect the track's appearance and behavior in the movie, such as start time, duration, size, position, visibility, and various other behaviors specific to each track.
The following steps describe in a general way how to add any type of track. Some tracks require you to provide additional information or set options not described in this section. For more specific information about each track, see the appropriate section later in this chapter or in GoLive Help.
To add a track to a movie:
- In the Timeline Editor, do one of the following:
- To have the track start at the beginning of the movie, drag the time cursor to the left-most position in the track content area (0 seconds on the time ruler). If you created a new file that doesn't have any tracks yet, the time cursor is positioned at 0 seconds by default.
- To have the track start anytime after the movie begins (such as after another track ends), drag the time cursor to the time when you want the track to start. For example, to start a track 1 second after the movie begins, drag the time cursor to the 1 second mark.
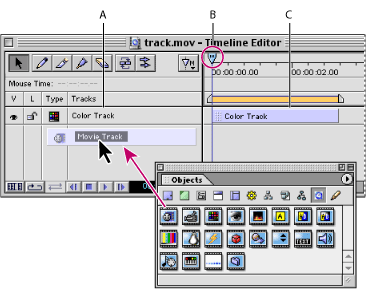
- Drag one of the track icons from the QuickTime set
 of the Objects palette into the track list area of the Timeline Editor. (To display the name of each track icon, briefly place the mouse pointer over the icon without clicking.) You can also drag a track icon to the track content area. If you drag a track icon that requires you to select a file (such as a video track), GoLive displays a dialog box for you to select the file.
 - Name the track by entering a name in the Title text box of the Basic tab of the Inspector. Alternatively, you can double-click the track name in the track list and enter a name in the text box.
- Set options and properties in the Inspector for the track you inserted. For more information on the properties, see Setting the basic track and sample properties.
Some types of tracks (such as a text track) let you display different track contents in the movie at different times. For example, you can have a text track display a word for the first five seconds of a movie, and then a different word for the next 10 seconds. The containers for these different track contents are called samples. When you add a track that uses samples, GoLive automatically creates the first default sample. But you also can create additional samples for the track. For information on creating samples, see Adding and editing samples.
Related Subtopics: