 |
Adding and editing samples
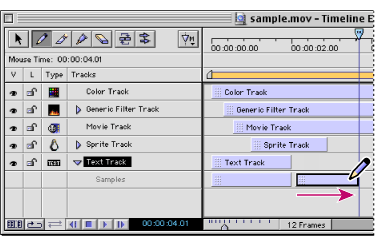
Some tracks contain samples that let you define certain attributes that are related to the type of track. For example, one of the attributes for a text track is the text content, and an attribute for a filter track is the type of effect, such as Cross Fade or Dissolve. In addition to defining attributes, a sample takes effect at a specific time and for a specific duration. For example, you can add three text samples in a text track that contain three different phrases that appear in the movie at three different times for different periods of time. You can also add samples in a filter track to use different effects at different times. Note that although video and audio tracks can contain samples, GoLive doesn't currently let you create or edit video or audio samples directly. (To create or edit video or audio samples, use a video or audio editing application such as Adobe Premiere.)
For tracks that contain samples, GoLive automatically creates a default sample when you add the track to the movie. You can add additional samples to a track or edit existing samples.
To add or edit a sample:
After you add or select a track that contains a sample, click the arrow to the left of the track name in the Timeline Editor to expand the track if the samples below the track are not displayed. Use the following tools in the Timeline Editor to add new samples or edit existing samples:
Create Sample tool
Use the Create Sample tool ![]() to create additional samples in the track content area. You also use this tool to create sprite keyframes. (See Using sprite tracks.) Click the Create sample tool, select a start point in the track content area, and then drag the sample track bar to the desired endpoint. GoLive adds the sample in the track content area and displays the corresponding sample Inspector.
to create additional samples in the track content area. You also use this tool to create sprite keyframes. (See Using sprite tracks.) Click the Create sample tool, select a start point in the track content area, and then drag the sample track bar to the desired endpoint. GoLive adds the sample in the track content area and displays the corresponding sample Inspector.

Divide Sample tool
Use the Divide Sample tool ![]() to divide an existing sample into two samples. The resulting samples have identical content, but their durations are shortened depending on where you divided them. After you select the Divide Sample tool, click the existing sample where you want to divide them. For example, if you divide a 25 second sample at the 10 second mark, the result is a sample of 10 seconds and another sample of 15 seconds. You can then drag each sample to the time interval you want and change its content as necessary.
to divide an existing sample into two samples. The resulting samples have identical content, but their durations are shortened depending on where you divided them. After you select the Divide Sample tool, click the existing sample where you want to divide them. For example, if you divide a 25 second sample at the 10 second mark, the result is a sample of 10 seconds and another sample of 15 seconds. You can then drag each sample to the time interval you want and change its content as necessary.
Glue Sample tool
Use the Glue Sample tool ![]() to set the end time of a sample to the start time of the following sample if there is a gap between the samples. After you select the Glue Sample tool, click the first sample. GoLive extends the first sample up to the start time of the following sample.
to set the end time of a sample to the start time of the following sample if there is a gap between the samples. After you select the Glue Sample tool, click the first sample. GoLive extends the first sample up to the start time of the following sample.
Delete Sample tool
Use the Delete Sample tool ![]() to delete a sample (or sprite keyframe). After selecting the Delete Sample tool, click the sample you want to delete.
to delete a sample (or sprite keyframe). After selecting the Delete Sample tool, click the sample you want to delete.
Swap Sample tool
Use the Swap Sample tool ![]() to swap two adjacent samples. For example, you can change the order of images in a picture track by swapping its picture samples. After you select the Swap Sample tool, drag the sample you want to swap toward the adjacent sample.
to swap two adjacent samples. For example, you can change the order of images in a picture track by swapping its picture samples. After you select the Swap Sample tool, drag the sample you want to swap toward the adjacent sample.
Move Sample tool
Use the Move Sample tool ![]() to move multiple samples at a time. After you select the Move Sample tool, drag the sample you want to move. GoLive moves all of the following samples in the same track to the right as a unit. This tool is especially useful for moving multiple picture samples in a picture track. You can't move the first sample of a track because it must have the same start time as the track itself.
to move multiple samples at a time. After you select the Move Sample tool, drag the sample you want to move. GoLive moves all of the following samples in the same track to the right as a unit. This tool is especially useful for moving multiple picture samples in a picture track. You can't move the first sample of a track because it must have the same start time as the track itself.