 |
Setting sprite appearance and behaviors
After you add a sprite, you're ready to set its appearance and behavior. You set its appearance by specifying whether the sprite is visible or invisible in the movie, and how the sprite overlays or interacts with other sprites in the movie. You also set its appearance and behavior by selecting images from the image pool that you want displayed when the movie runs, and when the viewer moves the mouse pointer over the sprite or clicks inside or outside the sprite.
The list of images and actions for a sprite are stored in its keyframe. Keyframes are similar to samples in that keyframes let you define attributes for a sprite, and you can have one or more keyframes for each sprite. In addition to defining attributes, a keyframe takes effect at a specific time. For example, you can create three keyframes for a sprite at different time points, each of which is assigned a different image. As the movie plays, the three images change at the time points where you created the keyframes. In addition, you can assign different actions to the keyframes to have the actions execute at different times. (See Wiring sprites with action.)
When you first add a sprite track, GoLive automatically creates a default keyframe for the the default sprite object. You can keep the default keyframe as it is if you want. But, in most cases you'll want to use it as a starting point and change its appearance and behavior, and assign your own images to it instead of using the default Untitled Image 1.
To set sprite appearance and behavior:
- Select the keyframe that you want to set. If you need to create a new keyframe, use the Create Sample tool
 to place the new keyframe in the desired location on the sprite track. For information on using the Create Sample tool, see Adding and editing samples.
 - In the Basic tab of the Sprite Sample Inspector, set either of the following options to set the appearance of the selected keyframe for the sprite:
- With the Main behavior box selected, assign an image to the keyframe for the sprite by selecting an image from the Image menu. After you select the image, its thumbnail appears in the Main behavior box. QuickTime displays the image assigned to the Main behavior box when the movie with the sprite begins running.
- To assign other images to other behaviors, select one of the following behavior boxes and then select an image from the Image menu:
- Over reveals the image assigned to it when a viewer passes the mouse pointer over the image assigned to Main. In other words, the Main image rolls over into the Over image.
- Click Inside reveals the image assigned to it when a viewer clicks and holds down the mouse button.
- Click Outside reveals the image assigned to it after a viewer clicks inside the sprite and then drags outside the sprite.
- To assign a cursor to the mouse pointer for each of the behaviors when the viewer passes over the sprite, select the behavior box and then select a cursor from the Cursor menu.
- In the Status text box, enter any information about the sprite that you want to display in the Web browser window's status bar when the movie runs.
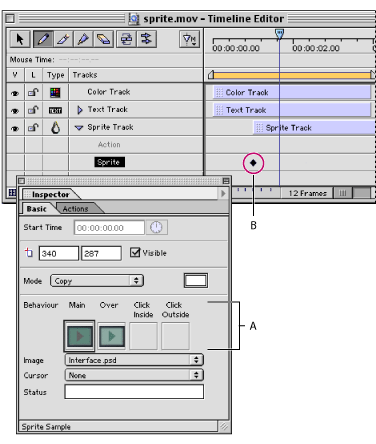
Visible
Makes the sprite visible in a QuickTime movie.
Mode
Specifies how the sprite overlays other sprites in the movie. (See Mode menu in Setting the basic track and sample properties.)