 |
About the CSS1 formatting model
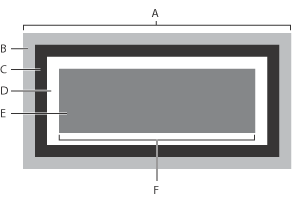
Cascading style sheets are based on a simple block-oriented formatting model. Each item that hosts a style consists of one or more rectangular blocks, each of which has a core content area with optional surrounding padding, border, and margin areas. This formatting model gives you much more flexibility in controlling spacing between objects.
To edit the block properties of a style:
- Select a style in the CSS Editor. In the Block set
 of the CSS Inspector, choose a length unit or a percentage (recommended for better scalability) from the Units pop-up menu to set the margins for a block element. Then enter a numeric value in any of the Top, Right, Bottom, and Left Margin text boxes, or use the All Margins text box to specify the margin in all four directions at once.
 - In the Padding section, set the amount of space between the block border and the style item.
- Under Block, set the width and height properties for any item formatted with the current style. This property is most useful with referenced items, such as images.
- In the Float pop-up menu, the float property creates a style item that is not part of the normal flow of text. Choose any of the following options:
- Left moves the style item to the left, so the text wraps on the right side of it.
- Right moves the style item to the right, so the text wraps on the left side of it.
- None causes the style item to appear where it occurs in the text.
- In the Clear pop-up menu, specify how an element accepts floating elements.
- Left moves the element below any floating element on the left side.
- Right moves the element below any floating element on the right side.
- None allows floating elements on all sides.
You can decrease the spacing between surrounding elements by entering negative values, which causes two elements to overlap.
![]() Using the View palette while in the Layout Editor, select Allow Overlapping Paragraphs to simulate how items with negative margin values overlap adjacent items.
Using the View palette while in the Layout Editor, select Allow Overlapping Paragraphs to simulate how items with negative margin values overlap adjacent items.
Choose a length unit or a percentage (recommended for better scalability) from the Units pop-up menu, and then enter a number in any of the Top, Right, Bottom, and Left Padding text boxes. Or, to specify the spacing in all four directions at once, use the All Paddings text box.
Choose a length unit or a percentage from either the Width or Height Units pop-up menus, and enter a number in the Width or Height text box. Leave one dimension set to Auto to ensure that the item is scaled proportionally. Leave both width and height properties set to Auto to display the referenced item in its original size.