 |
Adding elements or scripts to the head section
An HTML page consists of two major sections: a head and a body. The Layout Editor in GoLive mirrors this structure by providing a head section pane as part of the document window. You can use the head section pane to store page information that's used by Web browsers, including the page title and keywords. The head section of each page already contains a Title element for the page title that appears in the upper left corner of the document window.
You use the Head set of icons in the Objects palette to add empty tags to the head section of your Web page, and then you use the Inspector to specify the attributes for the element or script.
To add an element to the head section of a page:
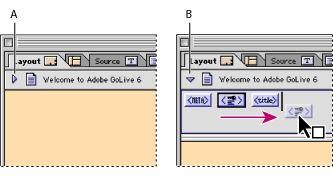
- Drag the desired icon from the Head set
 in the Objects palette to the body of the page. GoLive automatically moves it to the head section pane and opens the pane. (You can also click the triangle
  next to the Page icon
  in the upper left corner of the document window to open the head section pane.)
 - In the Inspector, choose various options and specify attributes for the selected element or script.
![]() You can bypass using the Objects palette to add head elements to the head section by Right-clicking (Windows) or Control-clicking (Mac OS) in the head section pane and choosing the object from the Insert Object > Head context menu.
You can bypass using the Objects palette to add head elements to the head section by Right-clicking (Windows) or Control-clicking (Mac OS) in the head section pane and choosing the object from the Insert Object > Head context menu.
The options and attributes in the Inspector vary depending on the type of element or script that is selected in the head section pane.
The Keywords element
You use the Keywords meta element to specify keywords for your Web page. Internet search engines use the information in the Keywords element when constructing their indexes. The Keywords Inspector lets you add, update, delete, and rearrange selected keywords in a list for the element. You can also add a keyword to the first Keywords element in the head section by selecting text in the page and choosing Special > Add Keywords--If no Keywords element exists in the head section, GoLive adds it automatically. The new keyword appears in the list in the Keywords Inspector.
Internet search engines rely both on keywords and page titles to find your pages. (See Changing the page title.)
Comments (head section)
You use the Comment icon to add hidden comments to your Web page, such as publishing information for future reference. To view the comments, you need to use GoLive or another source code viewer.
Note: You can also add comments to the body of the page and refer to them as you build the page in the Layout Editor. (See Adding comments.)
The Meta element
You use the generic meta element to include information about the Web page, such as a description of the page content. For each new page, GoLive automatically includes the following information using meta elements: file format (for example, text/HTML), character set used (for example, ISO-8859-1), and file creator (for example, Adobe GoLive). The Meta Inspector lets you choose an HTTP-Equivalent option to simulate header information that accompanies the page when it's sent by an HTTP server to a browser or the Name option to define a non-HTTP meta element.
Note: To change the file creator, choose Edit > Preferences, select Source, edit the source code as desired, and click OK. To change the character set for a new page, select the Encode tag in the head section of the page and select another character set in the Encoding Inspector. You can also choose the character set from the File > Document Encoding submenu. To change the character set for all new pages, choose Edit > Preferences, select Encodings, choose a new set, and click OK.
The Script element
You use the Script element to add JavaScript to the head section of your Web page. A script in the head section is executed while the visible body section of the page is still being loaded. You use the Head Script Inspector to enter a name for the script, choose the language or JavaScript dialect for a browser, specify the script file, and open the JavaScript Editor to edit the script file. (See Using JavaScript.)
The Refresh element
You use the Refresh meta element to instruct Web browsers to refresh the contents of your Web page or replace your page with another page after a specified interval. You may want to use this element if your page contains live material or if it's part of a sequential series of pages you are presenting to viewers. The Refresh Inspector lets you enter a Delay value in seconds to specify an interval before the page is refreshed or replaced with another page. You choose either the Target This Document option to refresh the current page or the Target URL option to replace the page with another page.
You can easily create a slide show by adding a Refresh element to each page that's part of the slide show. For example, you can add a Refresh element to the first page of the slide show that replaces the first page with the second page, and so on.
<no edit> elements
You use the Element icon to add <no edit> elements to the head section of your Web page. These are useful for adding code that has unusual syntax or that GoLive can't read, and for adding new unknown elements and ensuring compatibility with future versions of HTML and the Web browsers that support these versions. You use the Tag Inspector to edit the start and end tags, add the names and values of new attributes, and delete attributes from the list.
Text character encoding
You use the Encode icon to add a meta element that defines the character encoding for text in a document. By default, all new pages created in GoLive use the meta encoding element in the head section with the ISO-8859-1 character set attribute. You can change the character encoding by selecting the <ENC> object in the head section and selecting an encoding option in the Encoding Inspector. You can also change the character set for a document by choosing a different set from the File > Document Encoding submenu. (See Working with nonroman character sets.)
The Link element
You use the Link element to define relationships between your current Web page and other pages in your Web site, or on the Internet. (If you manage the pages in your site using the GoLive site window, you don't need to use the Link element.) You can use the information in the Link element to keep track of links between pages in a large site.The Link Inspector lets you specify the title, link name, and anchor name for the referenced page, the relationship and reverse relationship between the current page and the source or destination URL, a list of HTTP methods supported by the referenced page, and a Uniform Resource Number (URN) for the page.
Note: Most Web browsers don't use or support URNs or the Methods attribute.
The IsIndex element
You use the IsIndex element both to inform Web browsers that your Web page can be examined using a keyword search and to instruct the browsers to display a search text box for keywords when displaying your page. The Prompt text box in the IsIndex Inspector lets you enter the string that you want browsers to display with the search dialog box.
Note: The IsIndex element is obsolete.
The Base element
You use the Base element to specify the original location of your Web page, also known as the base URL. The base URL is used by Web browsers to locate relative links on your page. In the event that your page is moved away from its original location, the browsers can correctly locate the page's relative links using the base URL. The Write Base Always Absolute option ensures that all references are written back to the root of the site.