 |
Setting up target frames
When you set up navigations links to pages that are displayed in a frame set, you must specify each target frame as well as the page's URL.
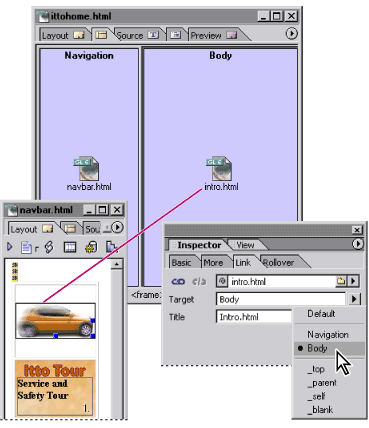
For example, if you use a frame set to display a table of contents in one frame and the pages linked to the table of contents in another frame, every link in the table of contents must specify the target frame in which the linked page will appear.

Each navigation link specifies both destination page (intro.html) and target frame (Body).
To specify the target frame for linked pages:
- Open the content page that contains the navigation links. (You can double-click the page icon in the frame to open the page.) For information on creating navigation links, see Linking files.
- For each link, in the Text Inspector or the Link tab of the Image Inspector, specify the target frame where you want the linked page to appear by choosing an option from the Target pop-up menu:
- A frame's name displays the linked page in that frame. The frame names of your open frame set appear at the top of the menu.
- _top displays the linked page in the full Web browser window, replacing the current frame set entirely.
- _parent displays the linked page in the parent of the current document. If the current page has no parent, the target _self is used. (The parent is the next highest frame set in the hierarchy.)
- _self displays the linked page in the window or frame that contains the link, replacing the navigation page.
- _blank displays the linked page in a new untitled window.
- Default removes any previously set target for the page.
![]() You can use the ForceFrame action to prevent browsers from displaying a page outside of the frame set you've created for it. You can also use actions to set multiple target frames for a single link. For information on the ForceFrame action and Target2Frame action, see Using GoLive actions.)
You can use the ForceFrame action to prevent browsers from displaying a page outside of the frame set you've created for it. You can also use actions to set multiple target frames for a single link. For information on the ForceFrame action and Target2Frame action, see Using GoLive actions.)