 |
Using the page design tools
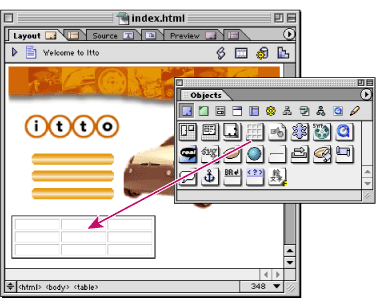
GoLive page design tools work together to save you time as you lay out content on your Web pages. For example, you can drag an object from the Objects palette into the body of your Web page and if it belongs in the head section of the document (such as the Keywords element), GoLive immediately moves it to the head section pane of the document window.
The document window
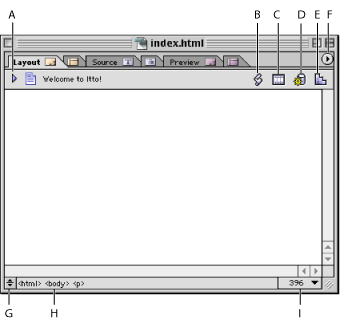
Web pages open in the Layout Editor of the document window by default. The Layout Editor is where you visually lay out the content of your Web page. Across the top of the document window are other tabs to work with the page's source code in the Source Code Editor or Outline Editor, lay out a frame set in the Frame Editor, and preview a browser simulation of the page in Layout Preview.
As you work in the Layout Editor, you can open windows for editing style sheets, JavaScript, dynamic database content, and floating box timelines by clicking buttons in the upper right corner of the document window.

GoLive supports standard HTML and XHTML. Using the menu in the upper right corner of the document window, you can choose a document type declaration for a specific standard such as HTML 4.01 Strict or cHTML (imode) for displaying pages on wireless devices. (See Adding or changing a doctype declaration.)
The markup tree bar at the bottom of the document window lets you select specific elements in the source code related to text or objects you have selected in the page layout.
You can split the document window into additional panes that display the head section of your page at the top of the window or the page's source code at the bottom. The source code pane is another view of the Source Code Editor. (See Editing HTML code in the Source Code Editor.)
The Objects palette
The Objects palette saves you from hand-coding HTML--it contains HTML elements and predefined source code that you can add to your page by dragging or double-clicking object icons in the palette. Some objects are placeholders (like the Image icon) that you use to create resource links from the page to their source files. Other objects are site references for colors, font sets, and so on, that are stored with a site or blank pages that you add to a site.

Objects are organized in sets in the Objects palette according to the general task you want to perform. For example, the Basic set contains objects for laying out the body section of a page and the Head set contains objects for adding meta information to the head section of the page. Other sets include objects for adding forms, dynamic database content, and frame sets to the page as well as GoLive smart objects for establishing links between images on the page and the applications they were created in. You also use the Objects palette to add components to a page, diagram objects to a design diagram, and your own custom objects or code snippets to the page layout or source code.
You can configure the sets of icons to match a restricted doctype, removing all the unsupported icons from each set and preventing you from adding the wrong objects to your page by mistake. (See Configuring the Objects palette for a doctype.)
The Inspector
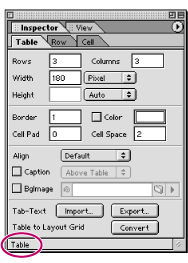
The Inspector is a context-sensitive palette containing options that change dynamically for whatever you're currently working on--for example, when you select a table or a floating box in a page, the Inspector becomes the Table Inspector or the Floating Box Inspector and contains options for setting table or floating box attributes. The Inspector provides options not only for page elements, but also for files or site assets in the site window, styles in a cascading style sheet, frames in a frame set, and more.

Always keep the Inspector visible as you build your Web site. Here is where you make all your modifications and enhancements to every element or object.
To open the Inspector, choose Window > Inspector. The name of the Inspector is based on the window item or page element that is currently selected.
Previewing tools
You can click the Preview tab in the document window to instantly preview a simulation of the content of your page layout as it might appear in a Web browser. Some objects (like navigational links to external URLs) must be previewed in a browser in order to see them work. You can use the Show in Browser button ![]() on the toolbar to automatically open your page in the Web browser of your choice. (See Previewing files.)
on the toolbar to automatically open your page in the Web browser of your choice. (See Previewing files.)
You can also change the view of your page layout in the Layout Editor to simulate different browser profiles on different platforms, such as Nokia XHTML Phone for wireless devices. Right-click (Windows) or Control-click (Mac OS) in the page and choose a profile from the View > Browser Profile context menu. (See Setting view options for page layout.)
The toolbar
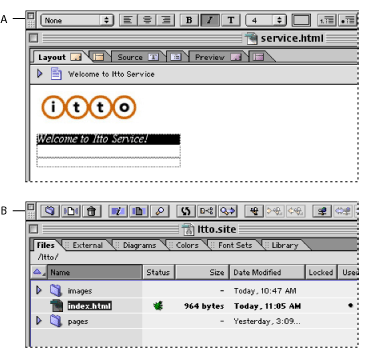
You use the toolbar when working with a page in the Layout Editor or files and site assets in the site window. The set of options on the toolbar changes according to what you have selected in the window--for example, when you select text in your page layout, buttons and pop-up menus for formatting the text become available in the toolbar. When you select the page in the site window, other options become available, such as for transferring the file to the Web server.

GoLive provides additional toolbars that are specific for working with workgroup sites (see Using the Workgroup toolbar buttons), source code (see Editing HTML code in the Source Code Editor), and dynamic content (see Using Dynamic Content).