 |
Working with WML elements
- Use only WML elements in your deck. If you place elements from the Basic set in the Objects palette into a WML document, the deck will not work correctly.
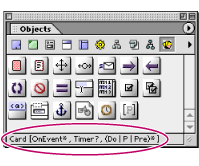
- Every element has content rules that determine what the element can contain. For example, a deck element can contain a template element and card elements. The content rules for an element are displayed to the right of the element name in the document window and at the bottom of the Objects palette when you point to an element icon. The content rules show which elements (and the number permitted) are allowed within an element. A question mark (?) next to an element name means 0 or 1 of those elements are allowed, a plus sign (+) means 1 or more, an asterisk (*) means 0 or more, and the pipe symbol ( | ) between two elements means either element is allowed. For example the content rule for a card is OnEvent?, Timer*, (Do | P)*. This content rule means zero or one OnEvent element is allowed, zero or more Timers, and zero or more Do or P elements are allowed.
- Limit the size of decks. WML browsers have memory restrictions, and a single large deck can fill up memory very quickly. The recommended size for decks is 500 bytes or less.
- If you edit the WML source code, keep in mind that WML is a case-sensitive language. For example, CARD and card mean different things.
Elements are the building blocks of a WML document. You add elements to a document by dragging icons from the WML Elements set of icons in the Objects palette to the document window.

Keep the following in mind as you work with elements:
To view the WML Elements icons in the Objects palette:
Click the WML Elements button in the Objects palette.
Note: You must enable the WML module in order to view the WML Elements in the Objects palette. (See Setting WML preferences.)
To add an element to a deck:
- Drag an element icon from the WML Elements set in the Objects palette into the document window. Release the mouse button when the pointer is over the colored area of the parent element.
- Set attributes for the element in its Inspector, including the following common optional attributes.
- id to specify an identifier for the element that you'll use later to link to it or to be use in server-side transformations. GoLive assigns a unique number to the id attribute by default, but you may want to change it to a more meaningful name.
- class to affiliate the element with one or more classes that you can use to group the elements. Separate multiple class names with spaces.
Note: If you drop an element in a location where it is not allowed by the content model, a warning appears and a red border is displayed around the element.
To select an element:
Click in the colored area of the element in the document window. A border appears around the element when it is selected.
To move an element:
Select the element in the document window, and drag it to a new location.
To delete an element:
Select the element in the document window, and press the Back space or Delete key.